Uploading your YouTube video correctly to make sure it will be shown to as many people as possible doesn't happen naturally. There are precise steps you should follow to ensure maximum exposure for your content.
Imagine this.
You worked really hard, developed your share-worthy video idea, wrote your video script, filmed and edit everything, and are finally ready to share your masterpiece with the world.
What's next?
Follow along with my 25-step system and go from final edit to fully-optimized YouTube video to give your next video the best possible start with my Ultimate YouTube Upload Checklist.
Upload Your First Video on YouTube
Well, we have to start somewhere, don't we... 😉
There are many apps and software solutions that support native video export to YouTube.
But today, we are doing it the old-fashioned way, via the YouTube web interface.
Log into your YouTube account and then locate the Creator menu in the top right corner of your screen.
It should look something like this, sometimes depending on your screen size you might only see the camera icon without the text:

Don't worry, if you don't see a red icon on the left side of the "Create" button. I use the TubeBuddy Chrome extension to assist me with my YouTube growth. (On a side note, I've also published an in-depth TubeBuddy Review on how it helped me to grow my YouTube channel from 0 to 3000 subscribers.)
Next, you click on "Upload videos".
A new popup should open:
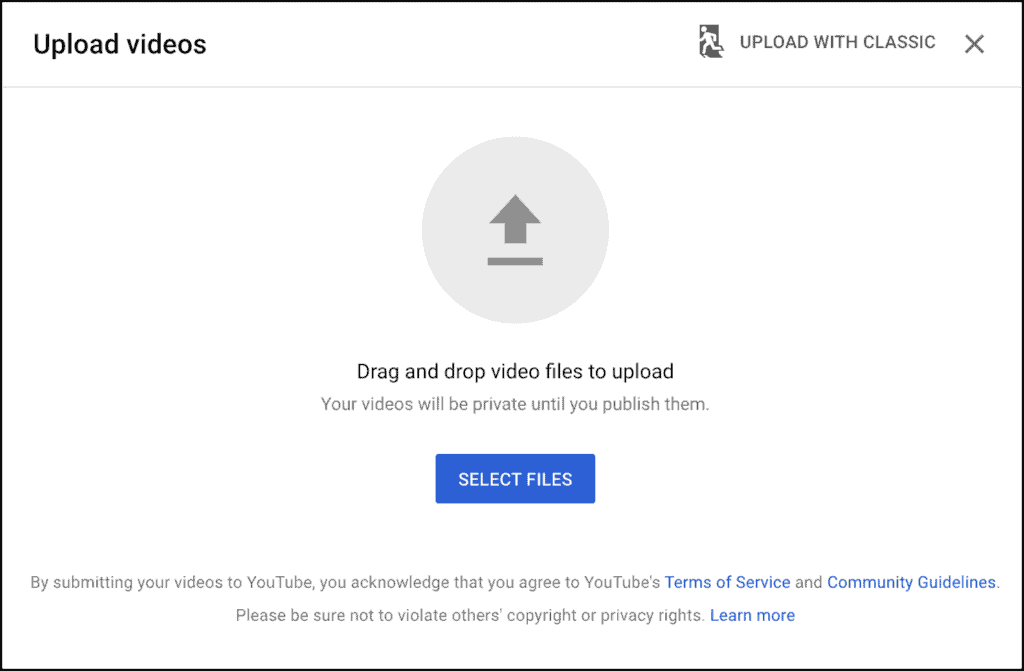
You might have noticed a small icon at the top right saying "Upload with Classic". This is the old upload function and will disappear very soon.
In this article, I'm showing you the new, modern upload workflow that is here to stay.
You can either click on "Select files" and locate your video (or multiple videos). Or you can locate your video on your computer and drag and drop it into the gray circle.
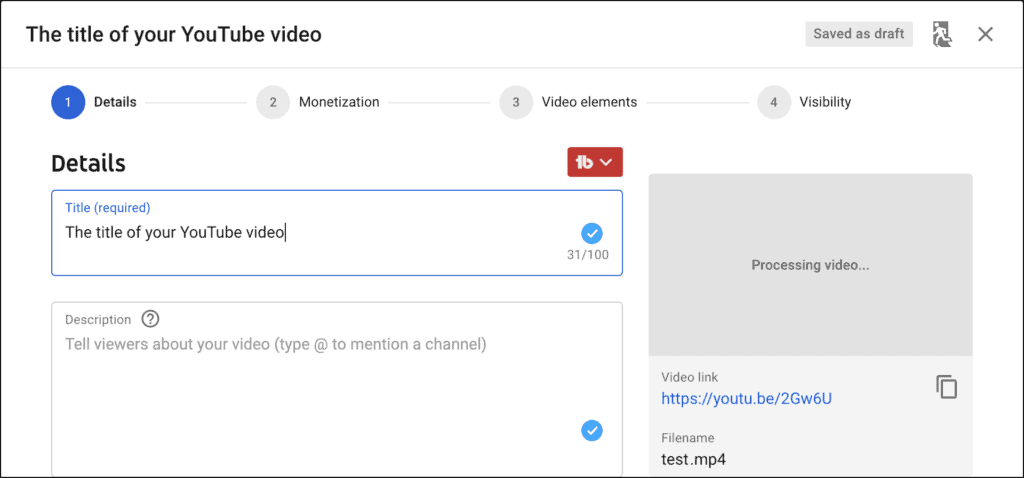
Write a Compelling YouTube Video Title
Writing a captivating video title is one of the biggest success factors when it comes to YouTube videos.
It has to be short and sweet, so people on mobile and desktop devices can quickly grasp what your video is all about without getting truncated.
The title has to communicate two elements. Who is this for? And what's in it for them? Why should they watch your video?
It also should contain specific keywords that someone might type into the YouTube search field to attract organic search traffic. This is especially important for small YouTube channels with less than 1,000 subscribers.
If you want to learn more, check out these two articles about how to write the perfect YouTube video title, and how to optimize your YouTube titles for YouTube SEO.
Write In Your YouTube Video Description
There are three schools of thought when it comes to how to write your YouTube descriptions.
The first approach is to use the description of your video as an extended opportunity to optimize your YouTube videos for SEO purposes.
In other words, you're explaining what your video is all about, and topics you're covering. This allows you to add a lot of additional keywords, that YouTubers might be searching for.
The next approach focuses on creating a call to action such as reminding your viewers to subscribe to your YouTube channel, or following you on Instagram, or watching some of your other videos about a similar topic.
And then we have a hybrid approach. It uses the top half of your video for additional information about your video, allowing you to optimize your video for YouTube SEO. And then it uses the bottom half to promote someone of your existing videos and external links that allow you to make money on YouTube, even when you're not yet monetized.
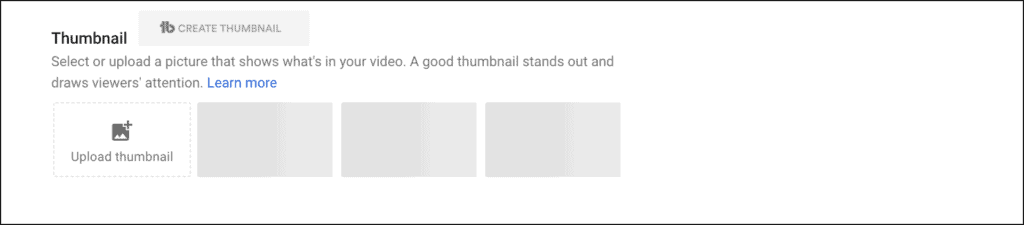
Design a Click-Worthy YouTube Video Thumbnail
Together with your video title, the video thumbnail has the biggest impact on your video click-through rate.
This is very important because it determines if YouTube will recommend your videos to other users who are not yet subscribed to your YouTube channel yet.
I recommend reviewing some of your favorite YouTube creators and to find a simple style that's resonating with you and the content that you're creating and then using that as the foundation to find your own style.
There are two very important keys to thumbnail success. Include a photo of yourself and use a big font to tease what your video is all about.
You can check out my tutorial on how to create animated video thumbnails for social media to get a good idea of how to design a simple, yet great-looking thumbnail for your video.
If you want to get into the nuts and bolts of thumbnail creation, here's the article to read: How to make customized thumbnails that get clicks for your YouTube videos.
Add Your Videos to YouTube Playlists
Every YouTube channel should have at least two plalist.
The first one should contain all of your published videos. This makes it very convenient for people who discover your channel for the first time to binge-watch all of your videos.
The second playlist should be one of many to come and contain all the videos of a particular topic.
When you're just starting out the "all videos" and "all about topic X" might contain the same videos, but that's going to change really quickly as you make more and more videos.
I use TubeBuddy to keep all of my YouTube playlists organized. It allows me to quickly sort all of my playlists with the click of a button. I love to sort all of my playlists by watch time and put the most popular videos at the top.
This has significantly increased the average watch time per viewer on my channel.
If you want to learn more about YouTube, check out my YouTube Success playlist.

YouTube's Community Guidelines
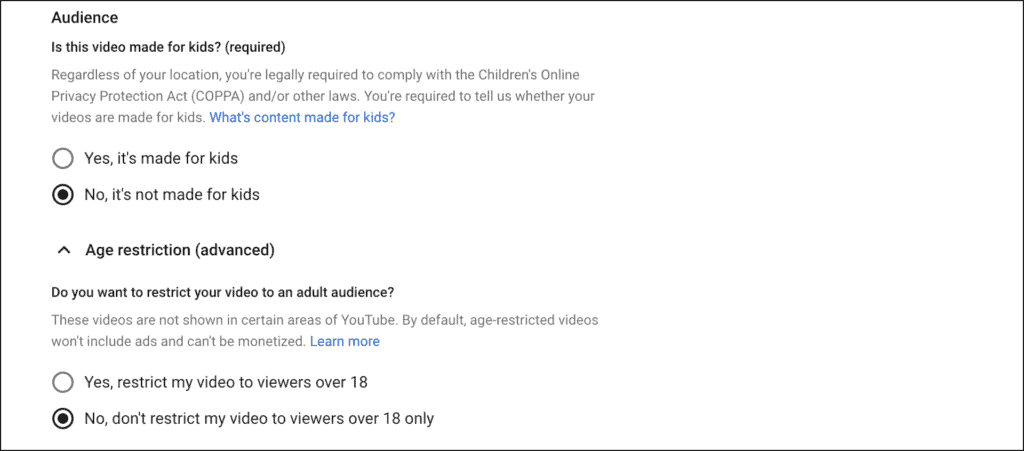
The first question is, has this video been made for kids?
In the USA, the age of a "kid" is defined as anyone under the age of 13. However, this number may be higher in other countries.
If your channel is not made for kids, then you should select "No".
The next question is, do you want to restrict your video to an adult audience?
You should select "Yes" if your video covers any of the following topics or themes: Violence, disturbing imagery, nudity, sexually suggestive content, or portrayal of dangerous activities.
Otherwise, select "No" and move on.
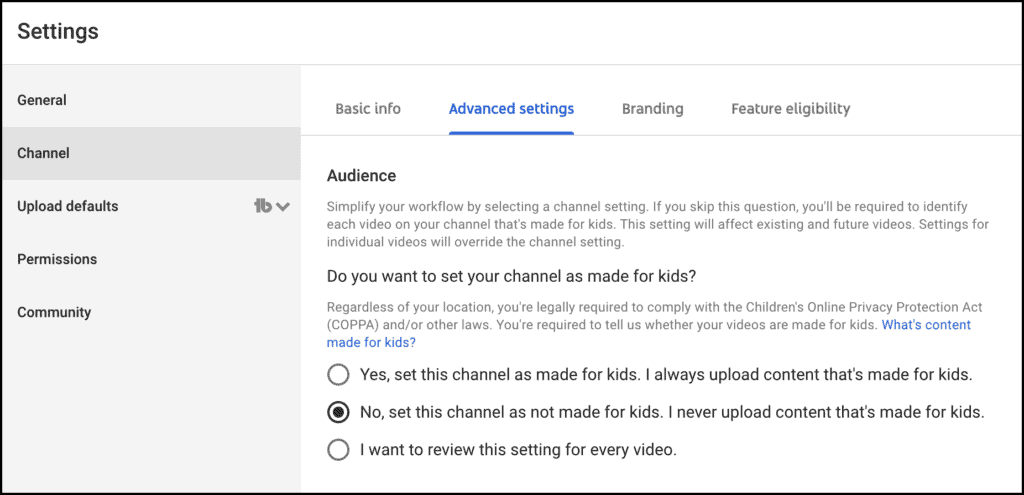
If all of your YouTube videos are not made for kids, you can visit the YouTube Studio, click on "Settings" and then under "Channel" select "No" as your channel default for new uploads.
Disclose Paid Promotions in Your YouTube Videos
If your video contains paid promotion or has been sponsored by a third party, you might be under a legal obligation to disclose this information to your viewers.
There are two options.
If you enable the first checkbox, you notify YouTube that your video contains paid promotion. YouTube may verify that your promotion complies with their ads policies.
If you check the second box, YouTube will notify viewers that your video contains paid promotions. This happens in the form of a small overlay for the first few seconds of your video.
In some jurisdictions, this is voluntary, in some, it's mandatory to disclose this.
I recommend checking both boxes if your video has been sponsored to be on the safe side.

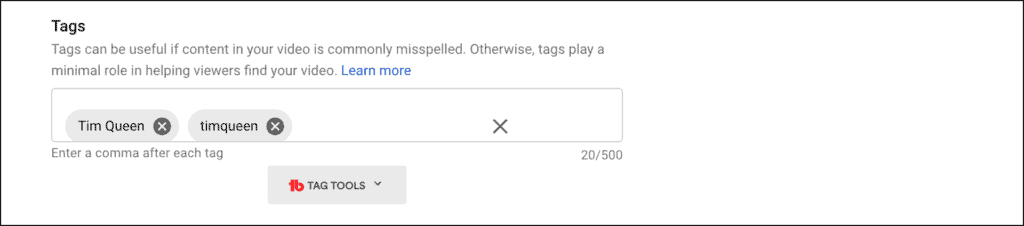
Add Tags to Your YouTube Video
Tags are one of the most underrated features on YouTube.
Many content creators don't use them. And if they do, they often use them incorrectly and add worthless tags to their videos.
Keywords are essentially little text snippets that people might type into the search field. If one of your keywords matches the search term, there is a good probability that your video will show up.
Especially, if you picked a "very good" keyword, that both have a high search volume and very little completion in terms of similar videos.
I use TubeBuddy to find the best keywords for my YouTube video tags. To activate this feature, I click on the "TubeBuddy Tag Tools" feature below the tags field.
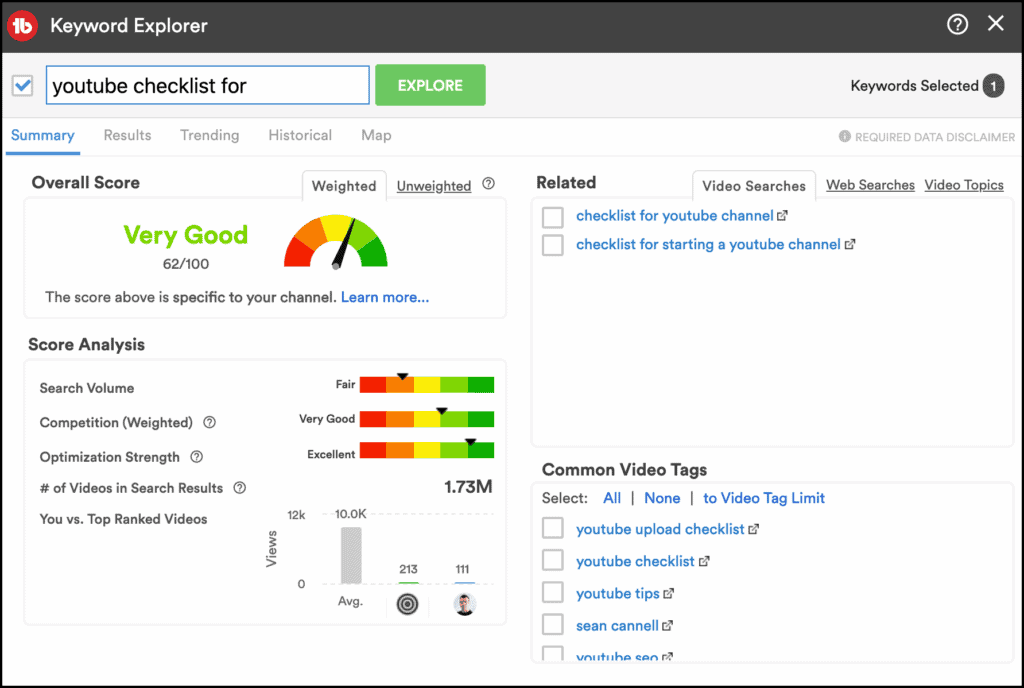
It opens up the TubeBuddy Keyword Explorer. In the top left corner, I can type in any keyword I want to research.
TubeBuddy will then access the YouTube database and find the search volume for this specific keyword and how many "competing" videos will be displayed on YouTube.
Base on these recommendations it will calculate the overall keyword score from red to green.
It will also give me related keyword ideas that I might add to my tags based on what some of the most popular YouTube videos with similar topics use in their videos, as well as some of the most popular, related searches on YouTube and Google.
Set the Language for Your YouTube Video
Setting your video language is an important step. It ensures that, if your video contains spoken words, it will mostly be promoted to people who speak the language of your video.
Funny compilations of cats and dogs will still be shown to everyone because they don't really contain any spoken words. In this case, you can just select your default language or English.
YouTube tracks all video views and then determines what languages each viewer is speaking, based on how many foreign language videos someone has watched.
Upload Subtitles for Your Video
The checkbox about caption certification is only relevant to a very small part of the YouTube creator community.
It's specifically targeting creators and publishing companies whose videos have previously aired on US television. These videos are legally required to continue to display subtitles even when re-uploaded to platforms such as YouTube.
In most cases you want to select the default setting, "This content has never aired on television in the U.S."
Using subtitles is a very good practice in general. It helps you to optimize your videos for YouTube SEO, as YouTube uses your subtitles as a full-text search engine.
It also helps people who have hearing problems, those who speak a foreign language and everyone, if your background sound level is very noisy to enjoy your videos.
I use a tool called Otter to transcribe all of my YouTube videos. If you sign up via this link, you get 100 extra minutes of free transcriptions.

Update the Recording Date and Location of Your Video
If you want to give viewers on YouTube the ability to search by date or location to discover your video, you may want to enter the date and location in the next section.
This is especially useful for time-relevant content such as news and allows YouTube to use both information to align it with a viewer's search intent.

Review Your YouTube Video Licenses
You have a choice between the Standard YouTube license and the Creative Commons Attribution license.
The Standard YouTube license is the default setting for all uploads. I highly recommend to stick with the Standard YouTube license, to maintain all of your rights.
By marking your original video with a Creative Commons license, you're granting the entire YouTube community the right to reuse and edit your video.
Because of that, you may only mark videos with the Creative Commons license, if your entire video consists entirely of content that you can license under the CC BY license, you can also switch to a Creative Commons license.
This could be your own, originally created content, other videos marked with a CC BY license, or videos that are in the public domain.
YouTube will prevent you from switching to the Creative Commons license if there is a Content ID claim against it.
Review Your YouTube Video Distribution Settings
You have two choices when it comes to distribution. You can show your videos "Everywhere" or only on "Monetized Platforms".
Now what's the difference?
According to YouTube, the following platforms are examples of platforms YouTube considers monetized:
- www.youtube.com
- YouTube app
- YouTube app on TVs including Xbox, Android TV, PlayStation and Chromecast
- m.youtube.com accessed from most smartphones
- YouTube app on Apple TV
"Everywhere" also includes the following placements:
- YouTube app pre-installed on iOS 5 and below
- YouTube legacy apps on feature phones and TVs
- m.youtube.com accessed from feature phones
The number of unmonetizable placements is steadily declining, as it mostly covers deprecated technology. I, therefore, recommend keeping the default setting of "Everywhere" for your video.
Allow Embedding of Your YouTube Video
Why wouldn't you want someone to embed your video on someone else's website? Doesn't it all add up to your views and watch time?
There are many reasons why you might want to turn embedding off.
Some users don't want to protect their brand by preventing their videos from appearing alongside content they don't approve of.
Some websites are able to hijack embedded videos and replace YouTube's built-in ads with their own. Result? You get your views and watch time but no AdSense revenue.
In short, there is no telling where your videos might show up.
If control over your brand is of the highest priority to you, I recommend restricting embedding.
Please note, that this also prevents you from embedding your videos on your own website. If you want to have both, you might want to check out Vimeo.
Notify Subscribers About Your New YouTube Video
This is such an important setting.
Did you know that your subscribers can receive a maximum of three new video notifications from your channel in a 24-hour period?
What if you have to upload more than three videos and you want to be selective about which videos you want to promote via email notification?
Imagine you want to upload a webinar replay to your YouTube channel, but you don't want to send out an email to each and every one of your subscribers.
In this case, just uncheck "Publish to subscriptions feed and notify subscribers" and you're good.
The video will be public and available in your videos feed for those looking for it.

Update Your YouTube Video Category
YouTube allows you to choose between 15 different categories for your videos.
- Autos & Vehicles
- Comedy
- Education
- Entertainment
- Film & Animation
- Gaming
- Howto & Style
- Music
- News & Politics
- Nonprofits & Activism
- People & Blogs
- Pets & Animals
- Science & Technology
- Sports
- Travel & Events
The question is, which is the right one for your video?
To answer these questions, it's worth looking back in time, to see where these categories originated from. In the early days of YouTube, these categories were actually explorable.
You were able to go to the YouTube Browser page and then click-through any of the 15 categories to watch more videos.
Think of YouTube's internal categorization engine more as a dynamic machine learning algorithm, that's constantly identifying, updating, and creating new categories. Everything is fluid and based on user behavior.
So while it doesn't really matter anymore which of the 15 categories you pick, just pick the one closest to your video. In doubt pick either "Education" or "Entertainment"

Allow Viewers to Comment on Your Video
Comments are an important factor when it comes to ranking your videos on YouTube.
Disabling can have a negative impact on your discoverability on the platform and should only be disabled in rare cases.
- You stirred up a hornet's nest. This is probably one of the most common reasons why people disabled comments on their channel.
When a YouTuber or brand is involved in a scandal or controversy, it's a very common phenomenon that all, or some of their videos get spammed with negative and hurtful comments. Even if it's a completely new video and has nothing to do with the controversy. If you want to avoid hour-long cleanup sessions for your comments feed, temporarily disable your comments until everything has blown over. - Your new video is controversial. Sometimes everything is fine, but the video your uploading right now contains a controversial opinion, you might want to proactively turn off your comments.
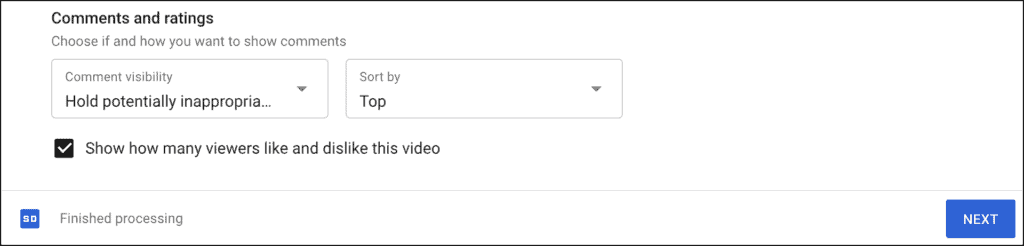
Alternatively, and that's my recommendation, turn on comment moderation.
There are three settings for comments.
- Allow all comments. Comment moderation is turned off. Everything is published instantly.
- Hold potentially inappropriate comments for review. Comment moderation is on. YouTube uses its comment AI to identify three types of comments. "All good" get published instantly. "Held for review" is a maybe where the AI isn't 100% sure about the content. This might contain a word from your block list, swear words, or links. The last category is "Likely spam". In this category, you find comments where YouTube is fairly certain that anyone would consider them spam. This can be triggered by the content of the comment itself, by past behavior of the person commenting, or past spam reports for similar comments.
- Hold all comments for review. This setting works exactly like the previous one, with the exception that even the "All good" comments are moved to the "Review" tab.
Either way, this is easily reversible later.
Display the Number of Likes and Dislikes on Your YouTube Video
The question is closely related to the previous question about disabling comments.
Sometimes a video might cover a sensitive topic or event and you don't feel it's appropriate to like to dislike something. Think of a funeral for example. In this case, turning off likes would be ok.
Another reason for disabling likes are controversial video topics when uploaders expect an overwhelming number of dislikes, turning off the likes feature might be an option.
I personally don't recommend doing it. First of all, likes or dislikes make no difference to the YouTube algorithm, both count as engagement and help your video to be seen by more people.
Secondly, those people who dislike your videos are only there for the short term and will eventually disappear.
Enable Monetization for Your YouTube Video
If you want to make money and run YouTube as a business, this is the most important setting of all.
First, you want to turn monetization to "On" at the top.
Next, you want to enable all ad placements that don't have a checkmark next to it.
If your video is longer than 8 minutes you can add additional mid-roll ads during the video. This can make a huge impact on the earning per video and I highly recommend turning it on.
Note: this feature is only available if you decide to join the YouTube Partner Program (so advertisers can run ads on your videos) and have fulfilled the requirements of 1000 YouTube subscribers and 4,000 public watch hours.
Self-Categorize Your Video for YouTube Ad Suitability
When you turned on monetization, YouTube will ask you to categorize the video based on YouTube's advertising guidelines.
For most content creators, none of these will apply, and they should select "None of the above" at the bottom of the page.
Try to be truthful, as YouTube will still run automated tests to determine if your video is ok or not.
If YouTube finds that you didn't accurately categorize your video, they might take away your ability to declare the ad suitability for your next video.
Why should you care about that?
Because if a video is on a knife's edge, YouTube will take the creators' self-certification into consideration and might allow a video for monetization.
While someone else who has been deceitful in the past might get the identical video demonetized based purely on an overly cautious AI algorithm.
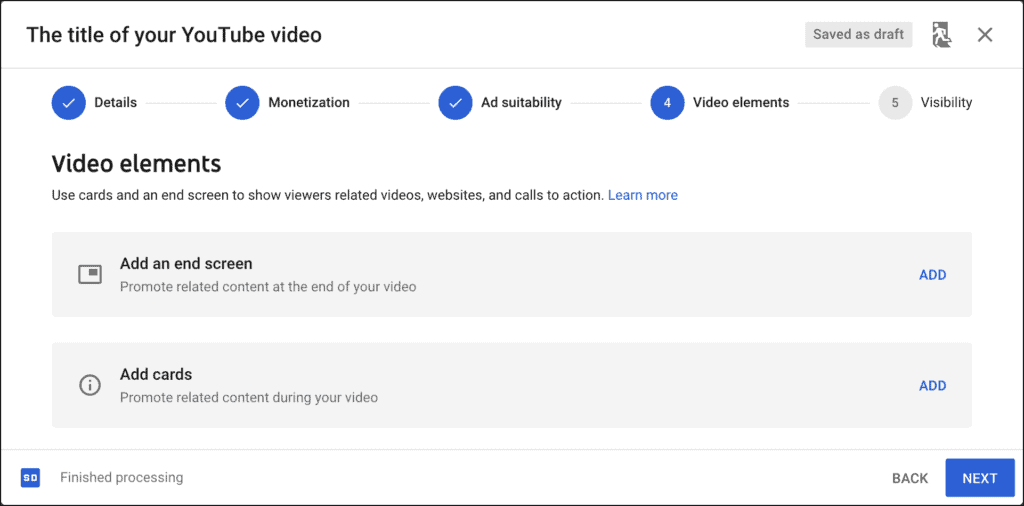
Add End Screens to Your Video
What are end screens?
Those are little boxes that video creators can place on top of their videos for the last 5 to 20 seconds of their videos.
There are five different elements that you can place on your end screen.
- Video. Link to another YouTube video. In most cases, you want to link to related videos of your own channel to maximize watch time and earnings.
- Playlist. Another great way to boost your views. Link to a topic-specific playlist of your own YouTube channel.
- Subscribe. Adding a subscription button on top of your end screen can boost the number of new subscribers.
- Channel. Have a second YouTube channel that you want to promote? Or did your video feature a collaboration with another channel? Why not give them a shout out by promoting their channel in your end screen.
- Link. This can link to an approved website. This can be YouTube partners such as Teespring, or your own website. You have to link and verify your domain to your YouTube account in order to make this work.
End screens are a great asset when it comes to increasing watch time and earn more money with your YouTube channel and I highly recommend adding end screens to all of your videos.
Add Info Cards to Your YouTube Video
What are YouTube cards? Same idea as end screens, but less obtrusive nudges during your video itself.
Elements are slightly different. You still have videos, playlists, channels, and links. Subscribe buttons are not available. But instead, you can add polls.
From my experience, the best use of cards is to promote videos and links that you're mentioning during your video. Just place a card for the exact time code and the direct link to either a video or link will pop up at the top right (i) info icon.
Choose the Right Visibility for Your YouTube Video
The video visibility screen looks a little intimidating at first.
Here is what you have to know. If you want to keep your video private for now, select "Save or publish" at the top, and then "Private".
If you want to share the link video link with someone without publishing it, for example as an early-access membership benefit for your Patreon membership site, then select "Save or publish" and "unlisted.
If you want to publish it right now, select "Save or publish" at the top, and then "Public".
This selection allows you to mark a second checkbox. "Set as instant Premiere" is similar to a live stream watch party. If your viewers tune in halfway through your video, they can't go back until your Premiere has finished.
At that point, your Premiere turns into a regular YouTube video.
If you want to publish your video at a specific time and date, you want to switch over to the "Schedule" section.
This allows you to select a date, time, and time zone when your video switches from "private" to "public". It's not possible to schedule an "unlisted" video with YouTube.
It is also possible to turn your scheduled YouTube video into a Premiere.
If you want to schedule an "unlisted" video, you can sign up for a TubeBuddy account.
This allows you to schedule any transition at any time. Private to Unlisted, Unlisted to Public, Public to Private. Whatever your heart desires.
If you are not ready to make your video public yet but want to run it by a couple of close friends, you can set it to unlisted and share the link with them.
Don't worry, YouTube subscribers can't see unlisted videos.
Once you made your selection, just click on the "Save" button at the bottom right and your video is ready to go.
YouTube will start to upload your video file during editing, so with a bit of luck, it might be already encoded by now, especially if it was a short video.

Apply Additional Privacy Settings for Your YouTube Video if Necessary
In some cases, you might want to enable additional privacy features for your videos.
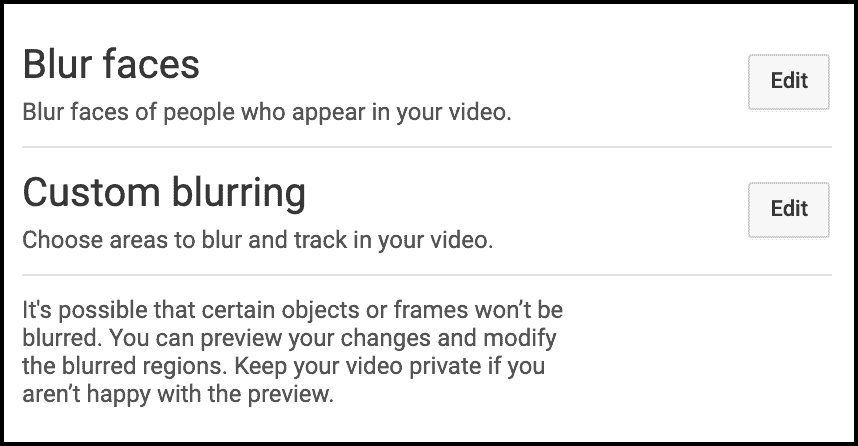
A good example could be if you wanted to blur out the faces of people who walked into your frame.
YouTube has a built-in AI to detect and blur faces.
- Open YouTube Studio.
- Click on "Videos" on the left.
- Open any video of your choice.
- In the left sidebar, click on "Editor".
- In the video timeline located the "Add Blur" button and click it.
- Next to "Blur faces" click on "Edit".
- Wait for the video to process.
- Select any specific or all faces that you want to blur.
- Then click on "save" and you're done.
Promote Your YouTube Video
Once your video is live or scheduled, it's time to promote it. I recommend a three-angle approach.
- Share your video on social media. Facebook, Instagram, Twitter (You can also share your video to Twitter using TubeBuddy), LinkedIn, TikTok, and Pinterest are good starting points and allow you to drive free organic traffic to your videos.
- Share your video with your email list. If you don't have an email list yet, sign up for a Moosend account and start building one. Email marketing is one of the most powerful promotional tools when it comes to building a successful and profitable YouTube channel.
- Share your video on your website or blog. If you have your own website or blog, why not link to some of your YouTube videos inside one of your articles? This is another easy to implement way, how to get free traffic to your YouTube videos.
Next Steps
Yay, you made it! Congratulations.
Now that you understand how to upload a YouTube video, it's time to work on other aspects of your YouTube channel.
Check out my YouTube articles on my blog to learn more about building a profitable YouTube business, watch my YouTube Success playlist, and subscribe to my YouTube channel to learn how to build a profitable YouTube business.